NoteThe system administrator can enable or restrict access to certain Advanced Options. Check with them for more information.
The following Advanced Options are available in the Report Designer, for both Advanced Reports and CrossTabs:
 Joins — fine control over how the data objects on a report relate to each other.
 Events — link a Server Event to the report. Server Events are custom bits of functionality created by the system administrator that occur when certain application triggers occur such as when the report is loaded, saved or during the execution cycle.
 Show Generated SQL — view the generated SQL query which retrieves the data used on the report
 Parameters — define reusable system variables, called Parameters, on the report.
To access these advanced options:
- (pre-v2021.1) Click on the
 Report Settings menu on the toolbar, hover over Advanced then choose one of the options
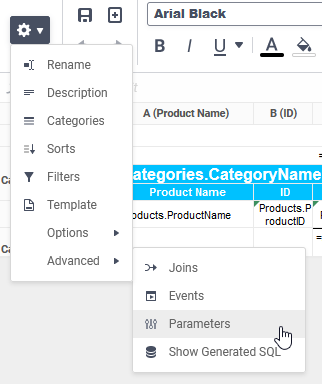
- (v2021.1+) Click on the Advanced

 menu on the toolbar, then choose one of the Advanced Options from the menu

Joins
If a report has two or more data objects, then information will only appear if the objects match. Using the Joins dialog, however, you may specify information you want to display regardless of whether or not it only exists in one of the data objects.
To learn more about joining data objects, review the Advanced Reports: Joins article.
Events
Event handlers may be applied to the report by advanced users for additional functionality.
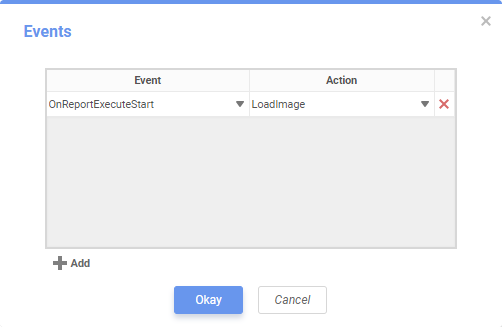
- Click
 Add to add a new event to the list.
 - Choose a server event trigger from the Event dropdown list. See Table A below for a list of server event names.
- Choose a server event action from the Action dropdown list. The actions available here are determined by the custom code entered into the application by the system administrator.
- Click Okay to save the server event to the report and close the dialog, or Cancel to close the dialog without saving.
An event can be removed from a report using the Delete  icon.
icon.
Upon triggering the event — e.g., OnReportExecuteStart will be triggered at the start of the report's execution — the associated action will take place.
|
Server Event Name |
Description |
|---|---|
|
OnDataCombined |
Called after all data is retrieved and combined from all data sources. |
|
OnReportFailValidation |
Called when a report fails validation while being loaded for editing or execution. |
|
OnReportExecuteInit |
Called after the report is loaded at the beginning of an execution, but before any processing has occurred. |
|
OnReportExecuteStart |
Called at beginning of report execution processing. |
|
OnReportExecuteEnd |
Called at end of report execution processing. |
|
OnWebServiceExecuteEnd |
Called after data is retrieved from a Web Service Method. |
|
OnExecuteSqlStatementConstructed |
Called after SQL statement due to report execution is constructed allowing any changes to be made. |
|
OnFilterSqlStatementConstructed |
Called after SQL statement due to filter dropdown is constructed allowing any changes to be made. |
|
OnParameterSqlStatementConstructed |
Called after SQL statement due to parameter dropdown is constructed allowing any changes to be made. |
|
OnOkFiltersDialog |
Called after Ok button in Filter execution dialog is clicked. |
|
OnOkParametersDialog |
Called after Ok button in Parameter execution dialog is clicked. |
|
OnLoadReportParameters |
Called when the report parameters are loaded but before any processing has occurred. |
|
OnScheduledReportExecuteStart |
Called at beginning of scheduled report execution. |
|
OnScheduledReportComplete |
Called upon completed execution of a scheduled report prior to further processing regardless of whether or not the report executed successfully |
|
OnScheduledReportExecuteSuccess |
Called upon successful execution of a scheduled report prior to further processing. |
|
OnChartPreRender |
Called just before rendering a chart. |
|
OnConfigLoadStart |
Called just after configuration file is loaded. |
|
OnConfigLoadEnd |
Called after configuration file is loaded, any changes are made, and host application container is redirected to the reporting application. |
|
OnRenameFolderStart |
Called just before renaming a report. |
|
OnRenameFolderEnd |
Called after a report is renamed. |
|
OnDataFieldsRetrieved |
Called after data fields are retrieved for a specific data object. |
|
OnGetUserPreference |
Called to retrieve a user preference. |
|
OnSetUserPreference |
Called to set a user preference. |
|
OnReportSaveStart |
Called before a report is saved. |
|
OnAfterLoadReportsList |
Called after reports built in this application have been loaded into the report tree object, for the purpose of allowing additional items to be loaded into the report tree. |
|
OnExceptionThrown |
Called when an application exception is thrown. |
|
OnExportCsvCell |
Called prior to exporting a CSV cell for the purpose of overriding the standard export results. |
|
OnAfterReportExportSuccess |
Called at the end of a successful report export. |
Show Generated SQL v2019.1–v2021.1
Show SQL v2021.1+
This dialog displays the SQL statement that will be sent to the appropriate data sources in order to execute the report.
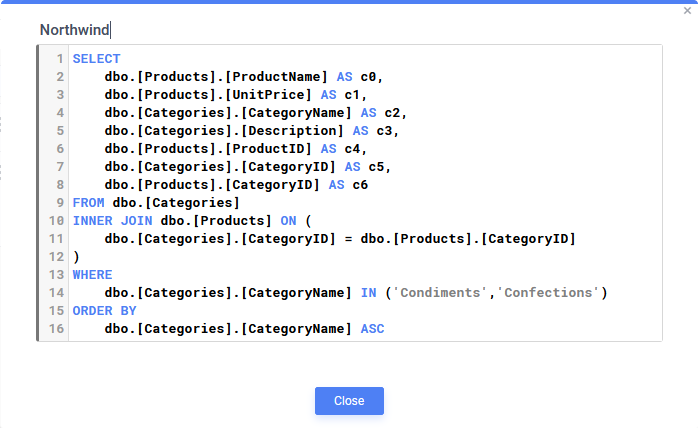
The SQL statement shown in the Execution SQL window is the exact statement that will be sent to the databases. It is generated after applying sorts, filters, parameters, and other items that affect the constructed SQL.
Report-Level Parameters v2019.1.3+
Advanced users may also define their own report-level parameters. The Parameters window provides an interface for users to view existing non-hidden system-level parameters and create new parameters that are only present on the report.
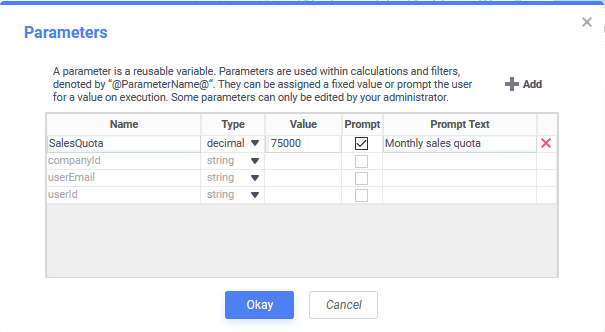
To create a new report-level parameter:
- Click the Add button located in the top-right corner.
- Define a unique Name. This value will act as the parameter's identifier within the report.
- Specify a Type for the parameter, the following are available:
- String
- Date
- Integer
- Decimal
- Boolean
- Enter a default or fixed Value. If left blank then the value will be interpreted as
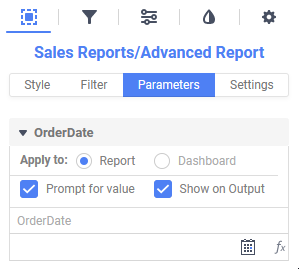
null. - Specify whether or not to Prompt the user for a value upon report execution.
- Define the Prompt Text, the message that will appear when prompting the user for a value. A value for this field is required if the parameter is prompting.
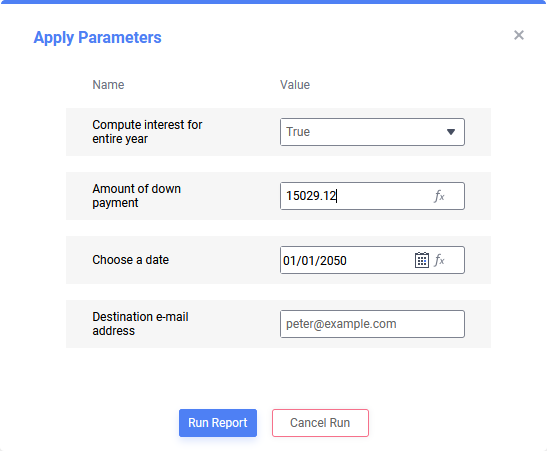
NoteReport-level and system-level prompting parameters will both appear in the same prompt window upon report execution.
Report-level parameters can be reused throughout the report in the same manner as non-hidden system-level parameters. They may be used as cell values or within filters, sorts, and calculations. To utilize a parameter within a cell or formula, surround its Name with '@' symbols (@ParameterName@).
For example, the following formula outputs True if an employee's revenue is greater than or equal to the value of the Sales Quota parameter and False if otherwise:
{OrderDetails.UnitPrice}*{OrderDetails.Quantity} >= @SalesQuota@
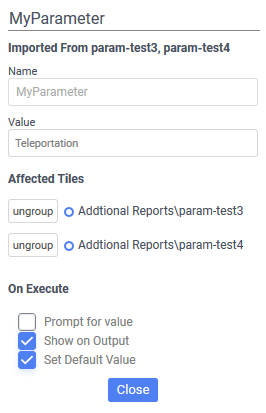
Using Report-Level Parameters in Dashboards and Chained Reports
Like system-level parameters, report-level parameters may be used and set to prompt for values in Dashboards and Chained Reports when the associated Advanced Report is added as an existing report.
Legacy Dashboard pre-v2019.2 interface:
Within composite reports, however, these parameters can only take affect on the report-level and cannot be set to take affect on the Dashboard- or composite-level. This means that these parameters are only applicable on their associated Advanced Reports and cannot be modified to also apply to other reports or visualizations within a Dashboard or other composite report.